Vulnerability scanning with vuls
![]()
Table of contents
Intro
No matter what server OS you run, it can be hard to keep up with what versions of packages you run as well as their vulnerabilities and the mitigations needed to stay secure.
This is where Vuls comes in.
Vuls is an open-source, agent-less vulnerability scanner based on information from NVD, OVAL, etc.
Summary
In this guide I will go over the simplest way to get up and running with vuls, how to configure for remote or local scans, and how to access and interact with the results. There are many methods available, feel free to check out the docs at vuls.io for more information. We will be using the method listed as:
Vulsctl - Quickest Vuls setup
Considerations
Before you begin there are some things to consider. For this guide I am using debian 12. Regardless these instructions should need minimal tweaking for other distributions. Not all OSes are supported. However just because a distribution isn’t listed does not mean it won’t work. Here is the table of supported operating systems as of this writing.
| Distribution | Release |
|---|---|
| Alpine | 3.3 and later |
| Ubuntu | 14.04, 16.04, 18.04, 20.04, 21.04, 21.10, 22.04, 22.10, 23.04, 23.10 |
| Debian | 8, 9, 10, 11, 12 |
| RHEL | 5, 6, 7, 8, 9 |
| Fedora | 32, 33, 34, 35, 36, 37, 38, 39 |
| Oracle Linux | 5, 6, 7 |
| CentOS | 6, 7, 8, stream8, stream9 |
| AlmaLinux | 8, 9 |
| Rocky Linux | 8, 9 |
| Amazon Linux | All |
| FreeBSD | 10, 11 |
| openSUSE | tumbleweed |
| openSUSE leap | 15.2, 15.3 |
| SUSE Enterprise | 11, 12, 15 |
| Raspbian | Jessie, Stretch, Buster |
| Windows | Client, Server |
| MacOS | MacOS X, MacOS X Server, MacOS, MacOS Server |
Dependencies
Docker
Getting docker set up is beyond the scope of this guide. I will provide several links to instructions for different distributions, but for this guide we will assume you already have docker working.
Links
I also highly recommend you complete the post installation steps.
Prereqs
There are slightly different prerequisites for the computer running the scan, and the computer being scanned. They are also slighty different depending on if you use the "deep" or the "fast" scan mode.
First on the computer running the scan we will need git.
sudo apt-get install git
If you are wanting to scan your local computer using this method you will need to run:
sudo apt-get install openssh-server
If you want to only do fast scans you are done! Otherwise on the computer you want to scan, whether it is your local one or a remote host run:
sudo apt-get install debian-goodies lsof reboot-notifier aptitude
Vuls
Next we will download and move into the vulsctl directory, and then update the vulnerability databases.
git clone https://github.com/vulsio/vulsctl.git
cd vulsctl
cd docker
./update-all.sh
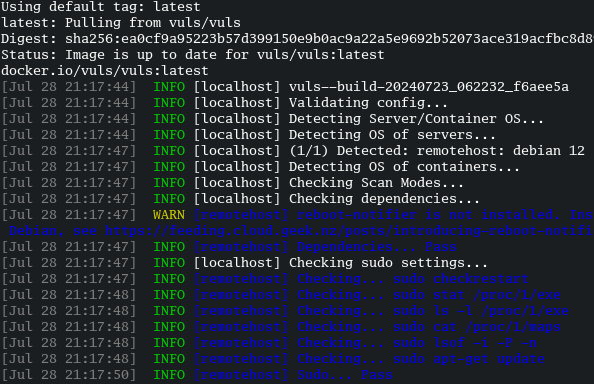
Coffee break ☕ Seriously this part takes a while. Running on my modest system with a 14th generation i5, 16gb ram, and a cheap SSD took around 3 hours. You should see a lot of this:

Configuration
Now we have to edit the configuration files depending on what we want to scan.
Local
The setup for Vuls for local scan using the docker images is bit more out of the way than a remote scan. This is not ideal, but is a cost of running Vuls without tampering with your system’s built in packaging. This is due to scan.sh scanning the docker container internally when pointed at localhost. Our solution here is going to be to configure an ssh server locally and then connecting vuls through that. In your top vulsctl directory you should have the file config.toml.remotescan that contains:
[servers]

[servers.remote]
host               = "Your-IP-here"
port               = "22"
user               = "user"
keyPath            = "/root/.ssh/id_rsa"
scanMode           = ["fast"]
Copy this file to your docker folder. While in your vulsctl directory run:
cp config.toml.remotescan docker/config.toml
Confirm overwriting the original if needed. Change the ip to your local IP address. You can run ip a to determine your ip address. If you would like to do a deep scan edit this file accordingly as well. I am running the scan from root so I will also edit the user.
Take note that scan.sh mounts your home folder as /root/ when running so the /root/.ssh/id_rsa in config.toml is actually referring to your ~/.ssh/id_rsa. Assuming you already have an id_rsa ssh key (if not you can find instructions on this here or try ssh-keygen -t rsa -b 4096). You will need to ensure the proper user has the public key in their ~/.ssh/authorized_keys file. For our example we are using root, so I added the contents of my ~/.ssh/id_rsa.pub into /root/.ssh/authorized_keys. You can use this command to do so replacing $USER with your username:
sudo cat /home/$USER/.ssh/id_rsa.pub >> /root/.ssh/authorized_keys
The scan will also require this to be in your known hosts, so go ahead and make sure your ssh is running with sudo systemctl start ssh and then we will connect to our account:
ssh root@192.8.1.184
Change the command to match your IP address and user you will be scanning from. SSH will ask if you know this host, just put yes and hit enter. You should now be set up to ssh into your local system. We are now ready to skip to the scan.
Remote
Similarly to the local configuration there is a config.toml.remotescan in the top vulsctl directory. It looks like this:
[servers]

[servers.remotehost]
host               = "192.168.100.1"
user               = "user"
port               = "22"
keyPath            = "/root/.ssh/id_rsa"
scanMode           = ["fast"]
Go ahead and copy this file to your docker subfolder:
cp config.toml.remotescan docker/config.toml
Overwrite as needed. Conveniently enough vuls looks to the user running the scan as /root. This means that as long as you have the ssh key to the remote server in your ~/.ssh directory as id_rsa (which is pretty typical) then all you will have to change is the user, host, and scanMode if desired.
For example, when I scan this webserver my file looks like this:
[servers]

[servers.remotehost]
host               = "h0bbl3s.port0.org"
user               = "root"
port               = "22"
keyPath            = "/root/.ssh/id_rsa"
scanMode           = ["deep"]
Go ahead and edit your file. Take note of this passage from the vuls.io docs:
Config, Scan, Report Prepare the config.toml in the vulsctl install directory similar to the configuration below.
[servers]
[servers.hostos]
host        = "52.10.10.10"
port        = "22"
user        = "centos"
/* if ssh config file exists in .ssh, path to ssh config file in docker */
sshConfigPath   = "/root/.ssh/config"
/* keypath in the Vuls docker container */
keyPath     = "/root/.ssh/id_rsa"
When config exists in .ssh, vuls refers to /root/.ssh/config in the docker container when connecting to SSH. However, an error occurs because the local user does not match the user in Docker. To deal with this, specify /root/.ssh/config in sshConfigPath.
The scan.sh will mount $HOME/.ssh from the host operating system into the Docker container, however you will need to SSH into the target server beforehand which will add your fingerprint to $HOME/.ssh/ known_hosts.
Scan
Ok now on to the fun part! When we run the scan, vuls will search through the host for all packages and known installed software as well as other markers for a CVE. in vulsctl/docker/ go ahead and run:
./scan.sh
You will see the scan begin:
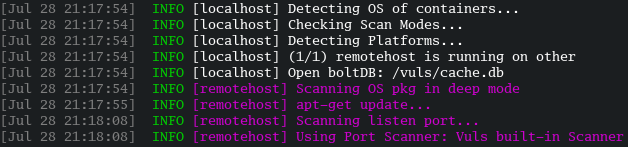
As long as you didn’t run into any errors here you can continue on to the next section.
Reports
There are two main ways to interact with the scans; the terminal user interface (tui) or the vulsrepo. Vulsrepo is a web interface. Before we do anything else lets look at the third option of running a report. This is an optional step to generate reports in the vulsctl/docker/reports directory in different formats such as json or xml for use externally from vuls. In the vulsctl/docker/ directory run:
./report.sh -h
This will bring up a help page showing you the options of report format.
Tui
The tui for vuls is very easy to use and lets you look through all of the vulnerabilities in found packages. If you have any open ports or services running you will find information about which are affected. You can also find a summary for each vulnerability, as well as mitigation options and other information. To run the tui make sure you are in the vulsctl/docker/ directory and run:
./tui.sh
You will see a display like this:
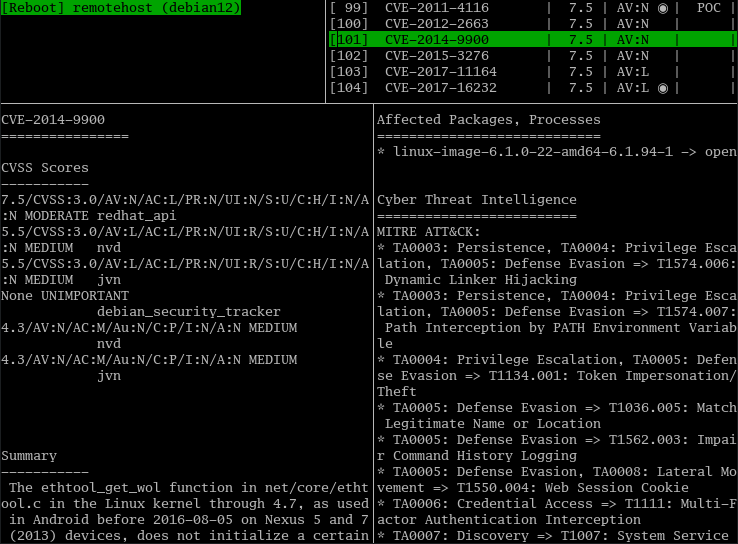
You can use the tab key and the arrow keys to navigate the results.
Vulsrepo
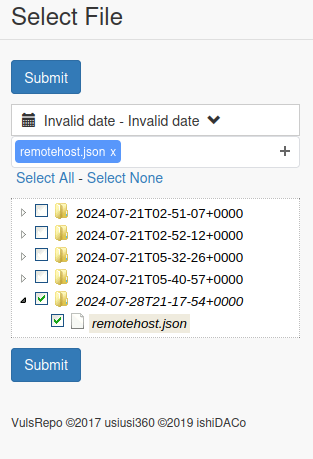
The web interface for vuls is known as Vulsrepo. There is far more to it than I will cover, you can find more information at the vulsrepo docs page. From the vulsctl/docker/ directory run:
./vulsrepo.sh
This will start a docker container running the web interface at 127.0.0.1:5111. To visit this page click here. You will be presented with a dialog on startup. Select the scan you just performed and click submit
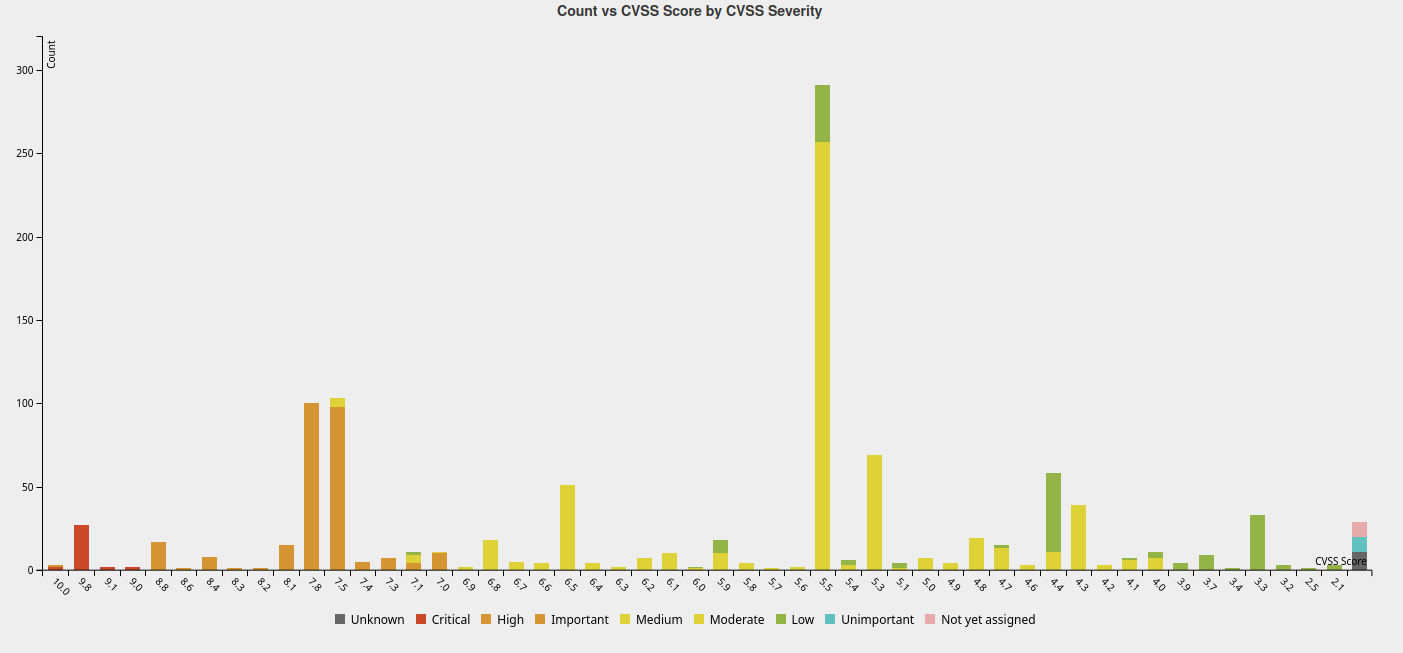
You will be presented with a default view. In the top left you can click and pick from several pre-defined views.
This is one of the default views:
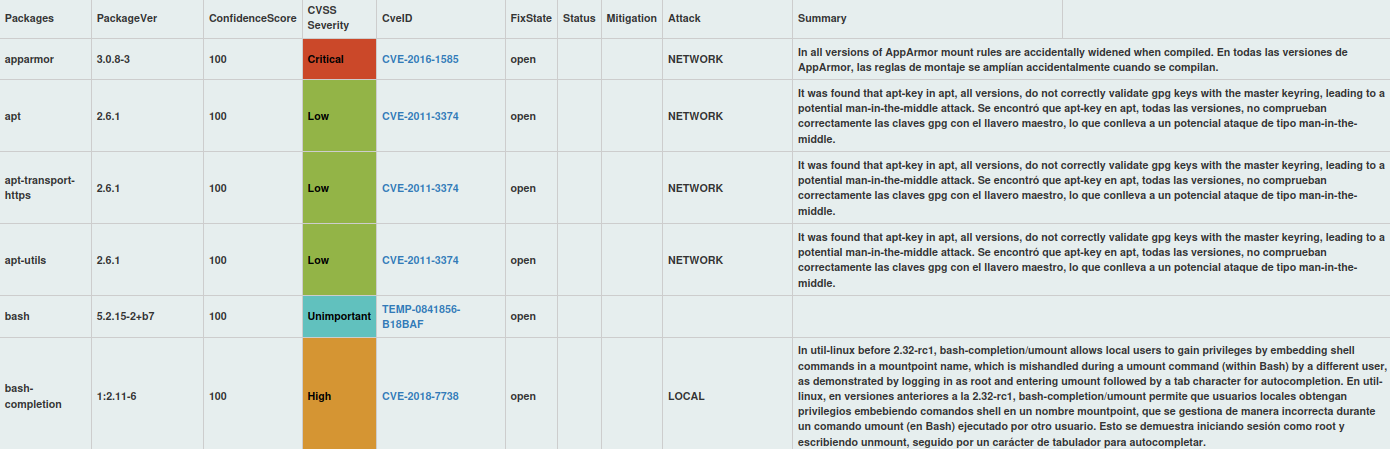
You can click into a CVE to view detailed information:

This is another view showing some of the details of the overall scan:
Afterword
Congratulations! You can now scan for and remedy vulnerabilities in your system! 🎉
Remember Vuls is capable of much more than this, such as performing scheduled scans, being configured to scan any number of systems, and keeping track of the changes to the host over time.
I wish you luck on your journey of securing your systems. I hope this has helped to open your eyes to all of the many packages your systems depends on, and how large of a job it is to keep track of all of them.