Setting up a secure blog using hugo, certbot, haproxy, and crowdsec
Table of contents
Intro
Here I will guide you through setting up a simple and easy to use yet very secure blog server. This entire server consumes around 500mb ram and 3gb hard drive space once setup. To see the results of this guide just observe the website you’re currently looking at! Here is my typical load on this server:
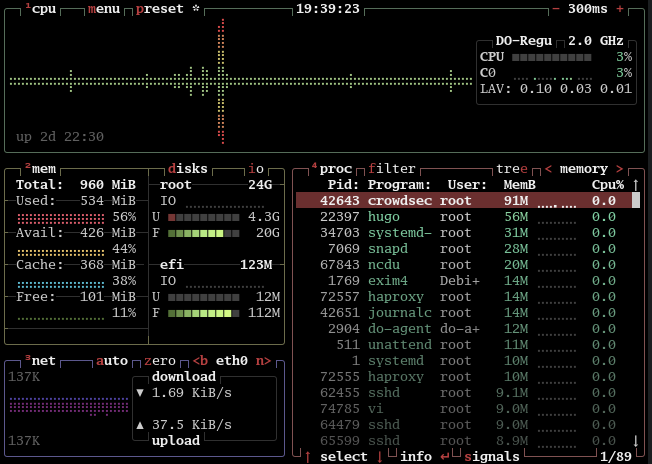
You can see that none of the software we are using requires much resources. This server is running on a Digital Ocean droplet with 1 cpu core, 1gb ram, and 25gb storage space.
Summary
I used to always hate hosting my own content, due to the obstacle of obtaining valid tls certificates. Let’s Encrypt and certbot have made this a very streamlined process so that anyone can serve their website over https for free without any hassle.
We will use gohugo(aka hugo) as our develpment webserver. This is a very small and nimble website generater written in go tailored for blogs. You could switch these instructions out to work with nginx or any other webserver easily.
Haproxy will route all web traffic to https and handle the connection.
Crowdsec runs in the background monitoring traffic for suspicious behaviour or known bad ips, reacting by alerting, forcing a captcha, or banning the ip for a period of time. Crowdsec will be setup to use iptables and haproxy as bouncers. I will also provide instructions to get started with hugo-bearblog.
Considerations
A couple of notes before we get started. These instructions were created and tested using Debian 12 Bookworm. This was performed on a clean install with nothing else running. Each process may not be appropriate for your system and configuration. Take care to double check the paths used etc. You should be able to find appropriate instruction for each subtopic for your distribution easily online. If you have questions, I can be found in the debian discord and irc channel. That said for most debian based distributions I expect the process would be close to identical.
This part is entirely optional for this guide. Here is more information. The way I access and secure my servers as root is to only connect to them over ssh when possible. One option is to generate an ssh key on your pc with ssh-keygen -t rsa -b 4096 -C "your_email@example.com" , changing the email of course, add the public key in your ~/.ssh/id_rsa.pub to your authorized_keys file in your root user’s ~/.ssh folder on your server, then delete the root account password on the server with passwd -ld root so there is no way to perform a password login. You can then use su to move between accounts. BE CAREFUL doing this as you can lock yourself out if your ssh key doesn’t work to get you in. Test it first.
You can also just disable password login over ssh in the /etc/ssh/ssh_config file if you’d like by uncommenting the line # PasswordAuthentication yes and changing the yes to no. This way you could use a keyfile but still have a non-root user for ssh then sudo to root. Remember to generate, install, and test an ssh key for whatever user you choose and setup sudo. I’d still suggest removing the root user’s password after sudo is setup and tested.
As a final note, I got inspiration for this from skarlso here. Some of the files I use are modified versions of the ones there. I had trouble with several parts of that guide and realised some of it was out of date, and that my current solutions combined with the addition of crowdsec for security could be helpful to people searching for a solution like I was. You will need a domain name. I use freedns.afraid.org for free dns entries to have somewhere to register the cert to.
Dependencies
This guide will assume you are running these commands as root. If you are running as a non super-user account add sudo where needed. Go ahead and update and upgrade your system before we begin.
root@localhost:~> apt-get update && apt-get upgrade
snapd
The first thing we will do is install snapd, which isn’t my favorite thing as we only need it to run certbot. This is however the method the official website suggests so we will go with snap here.
root@localhost:~> apt-get install snapd
certbot
First install cerbot.
root@localhost:~> snap install --classic certbot
Then we link /usr/bin/certbot to the snap binary
root@localhost:~> ln -s /snap/bin/certbot /usr/bin/certbot
We will generate the certificate and install it in haproxy later.
apt
Everything else you will need should be in the debian repositories.
root@localhost:~> apt-get install hugo crowdsec haproxy wget git
Configuration
The next steps will be creating a tls cert, configuring haproxy and crowdsec, and setting up a cronjob with a bash script to automatically build the cert for haproxy at a regular interval.
generateCert
The first thing we will do is generate the cert. Certbot will ask you for your domain name and an optional email address and then generate a certificate. If successful it will also setup auto-renewal of the certificate, although we will not use it because haproxy would prevent this. Note that this next step requires ports 80 and 443 (http and https) to be free so if you have any running web servers stop them before doing this such as systemctl stop haproxy.
root@localhost:~> certbot certonly --standalone
Next we will create the cert directory for haproxy if it doesn’t already exit.
root@localhost:~> mkdir /etc/haproxy/certs
Finally we will concatenate the two seperate generated cert files into the file haproxy needs to serve https traffic. Replace all occurances of example.com with your domain.
root@localhost:~> cat /etc/letsencrypt/live/example.com/fullchain.pem /etc/letsencrypt/live/example.com/privkey.pem > /etc/haproxy/certs/example.com.pem
Restart haproxy to ensure it loads the new cert.
root@localhost:~> systemctl restart haproxy
At this point your cert should be ready to use and you should be able to visit your server and verify your https is working, but you will only see a 503 error page.
crontab
Next we will write a small bash script setup with crontab. If you are not familiar, cron is a daemon that runs on nearly every unix descended OS. It simply performs actions at predefined intervals as a predefined user. Create a *.sh file in a folder accessible to root. Mine is /root/makeCert.sh. Take care to replace example.com sections to match your setup.
#!/bin/bash
# stop haproxy
systemctl stop haproxy
sleep 2
# remove the current cert from haproxy
rm /etc/haproxy/certs/example.com.pem
# generate new cert
certbot renew
# now we concatenate the two parts into the file needed for haproxy
cat /etc/letsencrypt/live/example.com/fullchain.pem /etc/letsencrypt/live/example.com/privkey.pem > /etc/haproxy/certs/example.com.pem
# restart haproxy
systemctl start haproxy
# this command will add a line to journalctl so you know the script ran to the end
systemd-cat -t "cert-rebuild" echo "Cert rebuilt! :)"
Now we will add a cron-job to rebuild the cert. First make sure your script is executable, then edit crontab.
root@localhost:~> chmod +x makeCert.sh
root@localhost:~> crontab -e
My crontab looks like this:
* * */89 * * /root/makeCert.sh
This sets the script to run every 89 days, just before the 90 day automatic renewal. Adjust to your requirements if cerbot gives you a different renewal period etc.
haproxy
Next you will mv the haproxy configuration file to a backup.
root@localhost:~> mv /etc/haproxy/haproxy.cfg /etc/haproxy/haproxy.cfg.old
Now use touch /etc/haproxy/haproxy.cfg to create a new empty cfg, or just use vim /etc/haproxy/haproxy.cfg or use nano if you prefer.
Copy the file below which is a modified version of skarlso’s changed to work with current haproxy. Make sure you change the example.com to match your domain, and change the your-ip to your public facing ip address you will use.
global
    daemon
    # Set this to your desired maximum connection count.
    maxconn 2048
    # https://cbonte.github.io/haproxy-dconv/configuration-1.5.html#3.2-tune.ssl.default-dh-param
    # bit setting for Diffie - Hellman key size.
    tune.ssl.default-dh-param 2048

defaults
    option forwardfor
    option http-server-close

    log     global
    mode    http
    option  httplog
    option  dontlognull
    timeout connect 5000
    timeout client  50000
    timeout server  50000
    errorfile 400 /etc/haproxy/errors/400.http
    errorfile 403 /etc/haproxy/errors/403.http
    errorfile 408 /etc/haproxy/errors/408.http
    errorfile 500 /etc/haproxy/errors/500.http
    errorfile 502 /etc/haproxy/errors/502.http
    errorfile 503 /etc/haproxy/errors/503.http
    errorfile 504 /etc/haproxy/errors/504.http

# In case it's a simple http call, we redirect to the basic backend server
# which in turn, if it isn't an SSL call, will redirect to HTTPS that is
# handled by the frontend setting called 'www-https'.
frontend www-http
    # Redirect HTTP to HTTPS
    bind *:80
    # Adds http header to end of end of the HTTP request
    http-request add-header X-Forwarded-Proto http
    # Sets the default backend to use which is defined below with name 'www-backend'
    default_backend www-backend

# If the call is HTTPS we set a challenge to letsencrypt backend which
# verifies our certificate and than direct traffic to the backend server
# which is the running hugo site that is served under https if the challenge succeeds.
frontend www-https
    # Bind 443 with the generated letsencrypt cert.
    # Make sure to change this line to point to your cert
    bind *:443 ssl crt /etc/haproxy/certs/example.com.pem
    # set x-forward to https
    http-request add-header X-Forwarded-Proto https
    # set X-SSL in case of ssl_fc <- explained below
    http-request set-header X-SSL %[ssl_fc]
    # Select a Challenge
    acl letsencrypt-acl path_beg /.well-known/acme-challenge/
    # Use the challenge backend if the challenge is set
    use_backend letsencrypt-backend if letsencrypt-acl
    default_backend www-backend

backend www-backend
   # Redirect with code 301 so the browser understands it is a redirect. If it's not SSL_FC.
   # ssl_fc: Returns true when the front connection was made via an SSL/TLS transport
   # layer and is locally deciphered. This means it has matched a socket declared
   # with a "bind" line having the "ssl" option.
   redirect scheme https code 301 if !{ ssl_fc }
   # Server for the running hugo site.
   # Put your public facing IP here.
   server www-1 your-ip:8081 check

# this was copied from skarlso's file, I'm not sure what it does or if we even need it.
backend letsencrypt-backend
   # Lets encrypt backend server
   server letsencrypt 127.0.0.1:54321
crowdsec
We used port 8081 for our server in our haproxy.cfg because crowdsec defaults to 8080. You could do this any way you want as long as they run different ports and haproxy.cfg points to the correct port for hugo. I actually did it the reverse way when setting mine up because my hugo was already running at 8080, but that requires en extra file edit. Now we will install our bouncers for crowdsec. Bouncers are the part of crowdsec that manage the actual blocking of the malicious traffic. First we install the firewall bouncer. This uses iptables and nftables to automatically handle insertion and removal of firewall rules for crowdsec. Ensure crowdsec is running with systemctl start crowdsec, then install the bouncer. The installer will automatically setup the connection between the bouncers and crowdsec, and then we will restart crowdsec.
root@localhost:~> apt-get install crowdsec-firewall-bouncer
You could stop there if you wanted, but many recommend installing the firewall bouncer, and then another bouncer for your web facing software. There are many options here in the crowdsec collections, but for our install we will use the crowdsec-haproxy-bouncer. Instructions are available here, but I will provide the steps I used here. Version 0.0.7 was current as of this writing, if it is not when you read it the previous link will help you find the current version. Upgrade instructions are also available there.
root@localhost:~> wget https://github.com/crowdsecurity/cs-haproxy-bouncer/releases/download/v0.0.7/crowdsec-haproxy-bouncer.tgz
root@localhost:~> tar -xvzf crowdsec-haproxy-bouncer.tgz
root@localhost:~> cd crowdsec-haproxy-bouncer-v0.0.7
root@localhost:~> ./install.sh
root@localhost:~> systemctl restart crowdsec
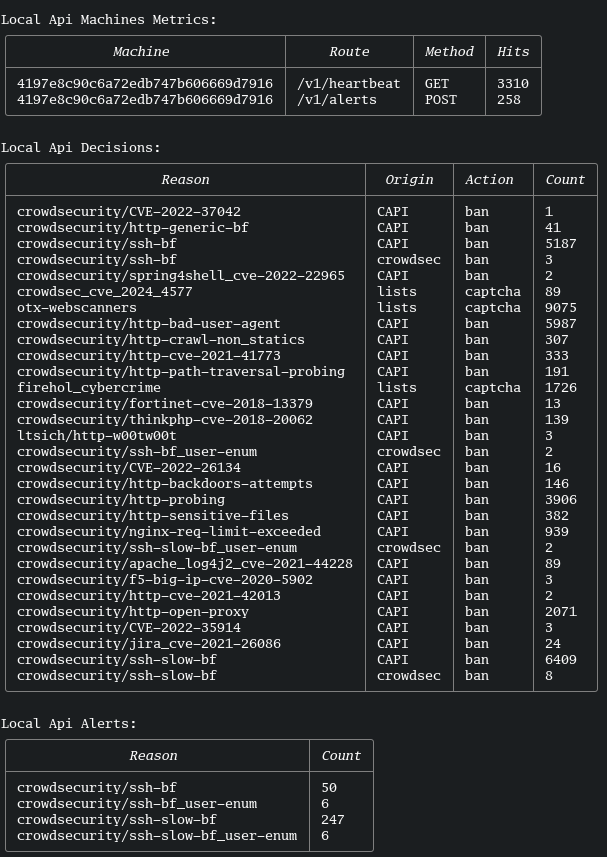
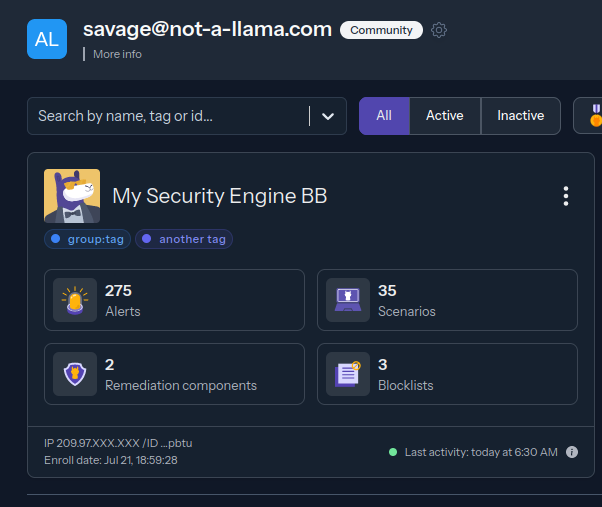
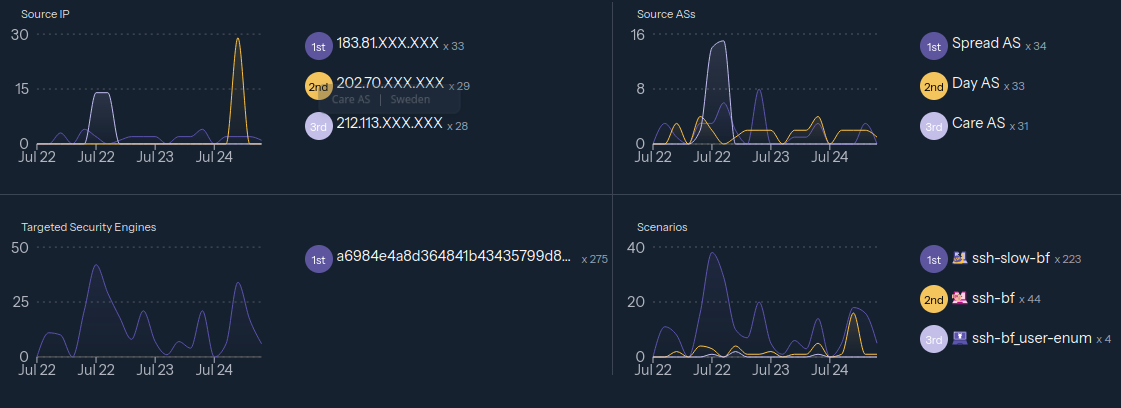
The install.sh will automatically find and configure the bouncer to your crowdsec. Further configuration and use of crowdsec is left to you, but here is a link to get started. I highly suggest setting up a few block lists and the crowdsec console(crowdsec.app). You will be able to monitor your security engine remotely with the console, set up and configure block lists, and view statistics. You can use the cscli command to interact with your crowdsec security engine locally. Try cscli metrics to see your current stats. Here is an example of the results:

Below is an example of some of the info you might see on the console.
goHugo
Hugo is an extremely fast static website generator and development server with a tiny footprint. There is far more to it than I will cover here, for more information about the usage of hugo see here.
Basics
Here we will assume you have a hugo folder ready to go. If this is the case all you need to do is cd into the website folder and start the server. Note that you need to set --bind=x.x.x.x to your public ip you will be using, and --baseUrl=https://example.com to reflect your domain. You can also set the base url in config.toml and hugo.toml in your website’s folder.
root@localhost:~> cd website
root@localhost:~/website> hugo server --bind=x.x.x.x --port=8081 --baseUrl=https://example.com/ --appendPort=false
You should now be able to visit your working and secured website via https! Hurray!
hugoBearBlog
Below are instructions to set up a site using hugo-bearblog by janraasch. If you need additional information such as configuring css styles please visit that site. We will use the example site template provided with hugo-bearblog to get started. First we need to create the website and cd into it. Then we will initialize a git repo in the folder for ease of adding themes. I personally took advantage of this by creating a repo on github and committing the website to it.
root@localhost:~> hugo new site blog
root@localhost:~> cd blog
root@localhost:~/blog> git init
Next we install the hugo-bearblog theme and copy the example site over to our main folder
root@localhost:~/blog> git submodule add https://github.com/janraasch/hugo-bearblog.git themes/hugo-bearblog
root@localhost:~/blog> cp -r themes/hugo-bearblog/exampleSite/* ./
You can now edit the ~/blog/content/_index.md file to edit your home page. While in the site directory you can run hugo new new-page.md to create a new page template in the content/ folder. For a new blog page use hugo new blog/new-post.md. Once you are done with that, we can go ahead and run the server. I will add & at the end to leave it running the background. You can manage background tasks with fg and bg. You are welcome to setup a systemd module as an alternative. Remember to change --bind=x.x.x.x to match your public facing IP and --baseUrl=https://example.com to your domain. Alternatively you can just change the config files and leave out the baseUrl flag.
root@localhost:~/blog> hugo server --bind=x.x.x.x --port=8081 --baseUrl=https://example.com/ --appendPort=false &
Congratulations! you should now have a running blog with working https and crowdsec for defense that looks an awful lot like this one.
Afterword
Phew! That was a lot. I hope you learned some things and accomplished your goals with this guide.
About two years ago I had one of my servers broken into. It was an ssh bruteforce attempt on an account with a somewhat weak password. The attacker had added themselves to my authorized_keys file for persistance. No major damage was done, but it was still a wakeup call. I get over 100 attacks a day on the server hosting this site and most are ssh bruteforce attempts. Crowdsec does an excellent job of shutting down these attacks, but even still I cannot stress how much I recommend not using passwords and using keyfiles instead. There is still a chance an ip unknown to crowdsec could slip through for a moment, but if you have no passwords to use, it will be nearly impossible for them to get in without a zero day exploit.
#hugo #haproxy #certbot #letsencrypt #crowdsec #debian #security #hugo-bearblog